Click here for Atmel® Wikipedia
Click here for Atmel® AVR® Wikipedia
Click here for Atmel® AVR® Datasheet
LedLooper with Atmel® AVR® Microcontroller
LedLooper with Atmel® AVR® Microcontroller guide is an LED implementation using Assembly programming.
The only thing you need to do is to convert the code to .hex format and send it to the Arduino card with avrdude.
Uses : Please see Requirements and Dependencies
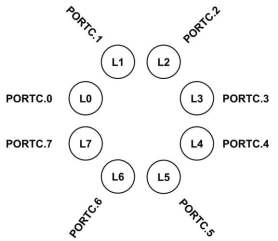
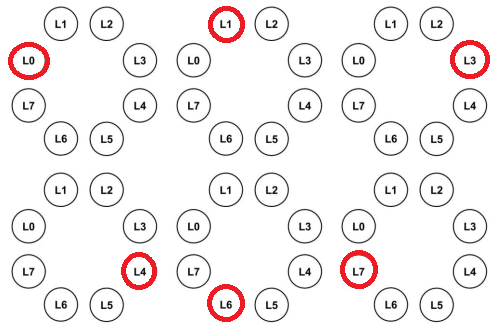
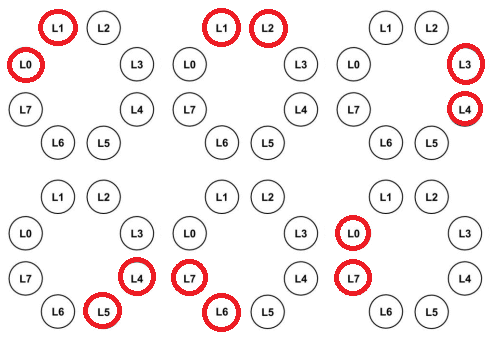
Layout Diagram
Working State
- In total, three function buttons will be used and the PORTB's 0, 1 and 2. Pins must be connected.
- The control of the buttons must be ensured by activating the
pull-upresistors.
The buttons will be called in the following sections:
- The button connected to pin 0th of PORTB is: SPEED
- The button connected to pin 1st of PORTB is: DIRECTION
- The button connected to pin 2nd of PORTB is: COUNT
The SPEED Function
The SPEED function refers to the : looping-speed of LED or LEDs moving in the desired direction. The speed will be set in three steps;
-
Slow,
-
Medium
-
Fast
-
Each time you press the SPEED button, the speed will increase one step.
-
Pressing this button again after the fast-mode, which is the last-step, will switch to the slow mode.
The DIRECTION Function
The DIRECTION function refers to the : two-different options. The direction will be set in two steps;
-
Clock-Wise
-
Counter-Clock-Wise
-
Each press of the DIRECTION button will change the direction of movement of the lit LEDs. When the direction of movement changes, the LED(s) that light up will move from there to the opposite direction.
The COUNT Function
The COUNT function refers to the : number-of-LEDs moving in the selected speed and direction. The selected number of LEDs will move sequentially so that there is no gap between them.
-
The COUNT button will set the number of moving LEDs. Each time you press the button, the number of lit LEDs will increase by one. Up to 4 LEDs can be increased; that is, the minimum number of lit LEDs is 1 and the maximum number of lit LEDs is 4. When the four LEDs are lit and the COUNT button is pressed again, the COUNT button will return to the state where 1 LED is lit.
-
There will not be a situation where all the LEDs are off.
-
It is not the case that two or more buttons are pressed at the same time.
-
After pressing any button, this process should only affect one-time on the system. In holding-pressing state, system LEDs should not stop moving and the rotation speed should not be affected.
-
When pressing/holding/pulling the buttons, the system is aimed at stable (bug-free) operation.
-
Our application is to operate the
eight LEDsin the form of acircular-ringas desired. -
Initially, only one LED will turn at a slow-speed in the clockwise direction. When the card is first powered-up, the system should start to operate by lighting the L0 LED.
-
On the led_looper.asm file, each line is explained together with the own individual task.
-
Use the
Atmel AVR 8-bitcommand set to ensure that you have the ability to write programs in assembly language -
By controlling the
LEDsandButtonsthat you connect to various pins of themicrocontroller, ensure that you learn the use of ports for input/output purposes. -
Ability to Automatic Cleaning feature
-
Ability to send Notifications
-
Detailed status-bar panel at the bottom
-
Can delete unwanted files with one click
-
Always top feature
- You should be familiar with AVR Arduino family
- You will need a text editor (i.e Notepad++, vim) or IDE (i.e Atmel Studio)
- You will need an Arduino electronic programming platform (with USB cable) - (Skip this if you have an Arduino Virtual Simulator)
- You will need a computer on which you have the rights to install AVR Arduino dependencies
- Avrdude CLI (To send the code to the Arduino)
- ATMega necessary libraries (Which model are you using)
LedLooper-with-Assembly was created to serve three purposes:
LedLooper-with-Assembly is a basically microprocessor programming learning repository coded in Assembly language using Atmel AVR
-
To act as a guide to learn basic Assembly programming with enhanced and rich content
-
To provide a simplest and easiest way to learn how
Registers & Program Counter & .ORG & OPCODESis working -
There is a source for you to develop yourself in Assembly and inreace your Assembly programming level
Project Manager - Furkan Türkal (GitHub: Dentrax)
We publish source for the [LedLooper-with-Assembly] in single rolling branch:
The master branch is extensively tested by our QA team and makes a great starting point for learning the Assembly language. Also tracks live changes by our team.
The base project code is copyrighted by Furkan 'Dentrax' Türkal and is covered by single licence.
All program code (i.e. Assembly, .asm) is licensed under MIT License unless otherwise specified. Please see the LICENSE.md file for more information.
-
Atmelis a leading manufacturer of microcontrollers and touch technology semiconductors for mobile, automotive, industrial, smart energy, lighting, ...
-
-AVR®
AVRis a family of microcontrollers developed by Atmel beginning in 1996. These are modified Harvard architecture 8-bit RISC single-chip microcontrollers.
References
While this repository is being prepared, it may have been quoted from some sources. If there is an unspecified source, please contact me.
Please check the CONTRIBUTING.md file for contribution instructions and naming guidelines.
LedLooper-with-Assembly was created by Furkan 'Dentrax' Türkal
You can contact by URL: CONTACT
Best Regards


