Copyright Lee H. Bergstrand and Jackson M. Tsuji, 2024
(To be updated once BackBLAST2 is complete)
backblast automates the use of NCBI BLASTP to search for gene clusters within a multiple bacterial genomes.
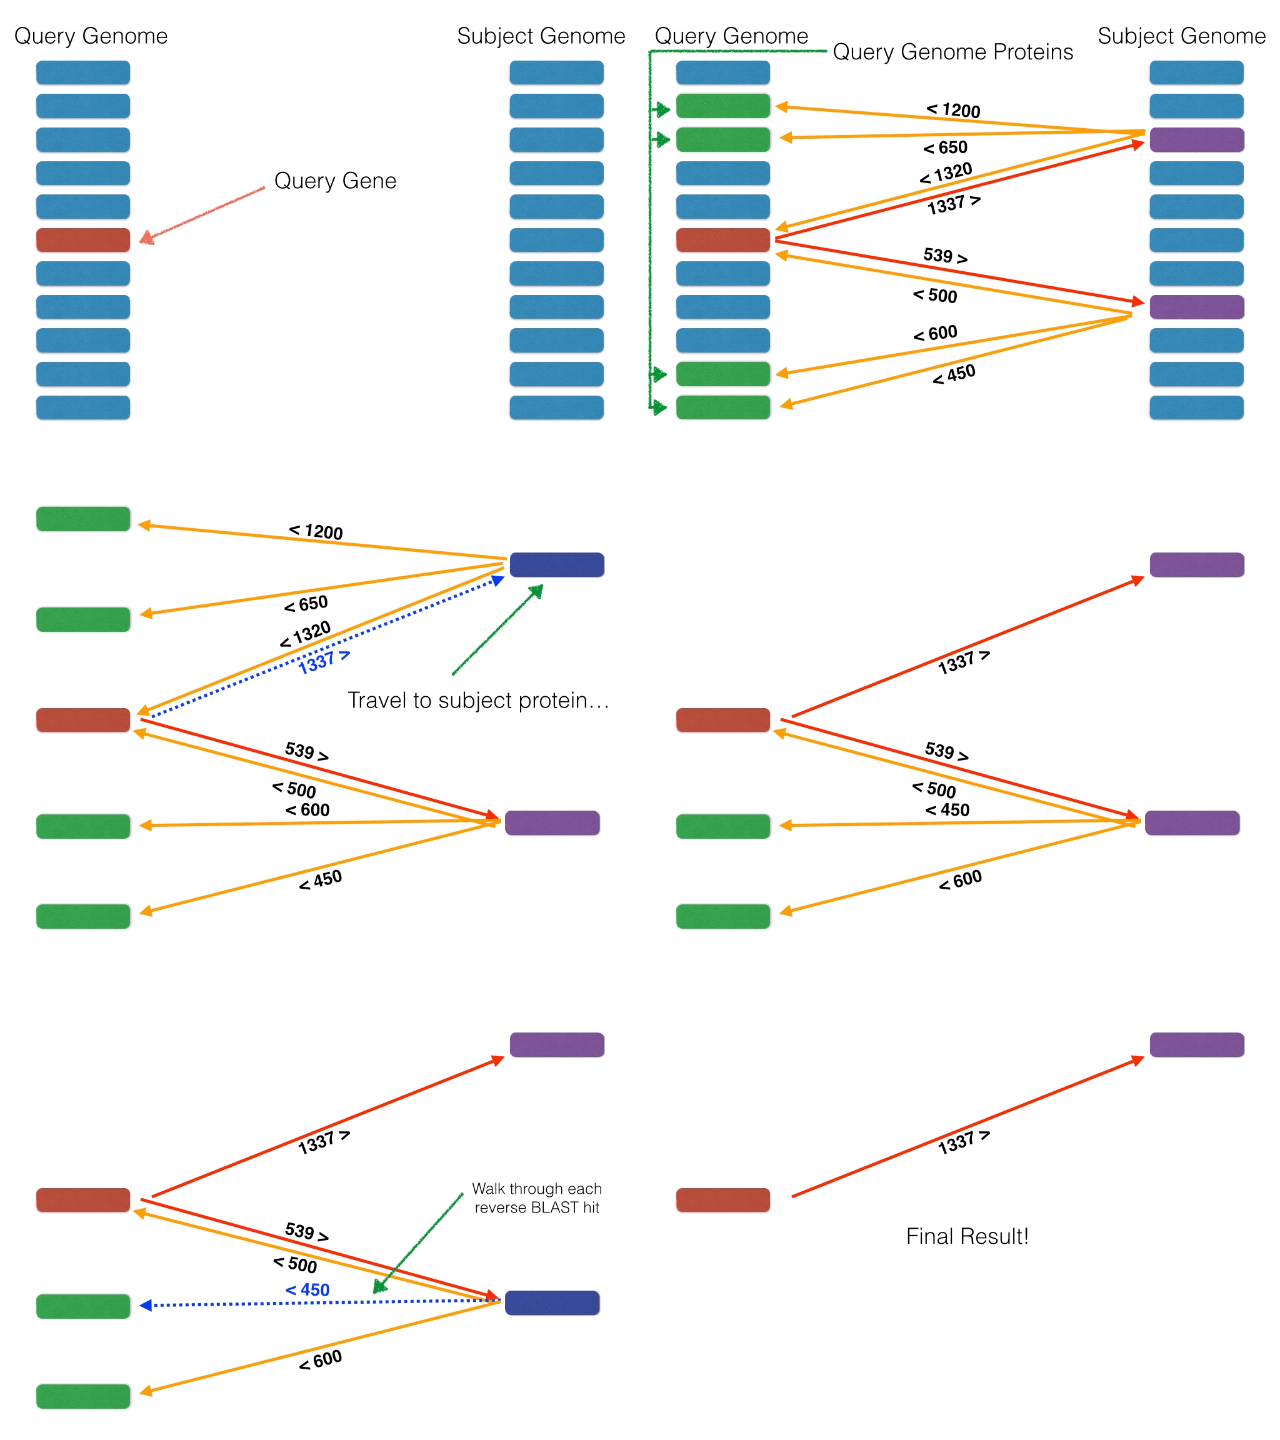
Non-orthologous genes are filtered out by identifying and extracting only bidirectional best BLASTP hits using a graph-based algorithm. The algorithm is illustrated below:
Furthermore, backblast allows users to visualize the results from bidirectional BLASTP in the form of a heatmap. Here is an example:

Temporary instructions while BackBLAST2 is still under development
- Linux operating system (e.g., Ubuntu) or MacOS (tested on Sonoma 14)
- miniconda or miniforge
- Workflow is pretty light on RAM, CPU, and storage space, so most machines should be able to handle BackBLAST without issue. The only exception is if you create genome trees within the pipeline, in which case you'll need a fair amount of CPU and time to calculate large trees.
Takes a few steps -- to be revised once we make a conda install.
# Download the repo
git clone https://github.com/LeeBergstrand/BackBLAST_Reciprocal_BLAST.git
cd BackBLAST_Reciprocal_BLAST
git checkout develop # optionally go to a specific branch or version tag

# Create the conda env
conda env create -n backblast --file=environment.yml

# Copy the key repo contents into a conda share folder
conda activate backblast
mkdir -p ${CONDA_PREFIX}/share/backblast
cp -r * ${CONDA_PREFIX}/share/backblast

# Remove the original repo
cd ..
rm -rf BackBLAST_Reciprocal_BLAST

# Add instructions to export the BackBLAST folder to the PATH when the repo activates
mkdir -p ${CONDA_PREFIX}/etc/conda/activate.d

if [[ ! -f ${CONDA_PREFIX}/etc/conda/activate.d/env_vars.sh ]]; then
  echo '#!/bin/sh' > ${CONDA_PREFIX}/etc/conda/activate.d/env_vars.sh
fi
echo "export PATH=\${PATH}:${CONDA_PREFIX}/share/backblast:${CONDA_PREFIX}/share/backblast/scripts" \
  >> ${CONDA_PREFIX}/etc/conda/activate.d/env_vars.sh
chmod 755 ${CONDA_PREFIX}/etc/conda/activate.d/env_vars.sh

# Re-activate the repo to apply the changes
conda deactivate
conda activate backblast
Now you should be good to go! Run backblast -h to get started.
Rough notes on develop version for now. More specific documentation can be found by installing the tool and running backblast -h.
# Set up the run
backblast setup query.faa query_genome.faa subject_dir output_dir
# Then edit output_dir/config.yaml
# You can also edit output_dir/gene_metadata.tsv and output_dir/genome_metadata.tsv to make the plot look better

# Start the run
backblast run output_dir/config.yaml output_dir
# All done! You can iteratively refine the plot from here as you'd like.Gets the job done without any custom settings
backblast auto [OPTIONS] query.faa query_genome.faa subject_dir output_dirTry a test run from inside the repo with:
mkdir -p testing/outputs
# Make sure backblast is added to your PATH before running the test
backblast run testing/inputs/config.yaml testing/outputs --notemp

# See if the output files looks as expected
cmp testing/outputs/blast/combine_blast_tables/blast_tables_combined.csv \
  testing/outputs_expected/blast/combine_blast_tables/blast_tables_combined.csv
cmp testing/outputs/heatmap/BackBLAST_heatmap.tsv \
  testing/outputs_expected/heatmap/BackBLAST_heatmap.tsv

# Clean up test if everything looks good
rm -r testing/outputsMore details will be coming on the wiki, or run backblast -h after installing the tool for specific documentation. Enjoy!
