-
Notifications
You must be signed in to change notification settings - Fork 0
Archived wxFB Tutorial
Adapted from version 1.0 by Juan Antonio Ortega and José Antonio Hurtado
-
Open wxFormBuilder and start an empty project by pressing
 .
You can also execute
 File | New.
-
Configure the project settings from the
Object Propertiespanel.- Choose which code will be generated. Currently, you can generate C++ and/or XRC code.
- Set the file name of the generated file (only the name, without the extension).
- Type a name for your project.
- Set the path in which the code will be generated. The relative path "." will cause the code to be generated in the same directory as the project file.
- Check
relative_pathif you want all file referenced by your project (e.g. images) to be generated with a relative path. - Save your Project.

-
Go to the component palette and click on the
Formstab. Then, create a dialog by clicking on the third icon.
Now the dialog is shown in the Object Tree.

-
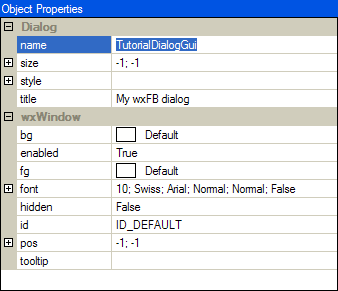
Now you can configure the dialog properties in the Object Properties panel. For example, change the name of the dialog to
TutorialDialogGui. That name will be also the name of the generated C++ class.
-
After that, you are ready to populate your dialog with controls and sizers. wxFormBuilder only supports sizer based layouts, so you will have to add a sizer to be able to insert controls. Go to the Component Palette and click on the Layout tab. Then, create a box sizer by clicking on the first icon.

-
Add some controls to the sizer, for example, two buttons. So, go to the
Commontab and press the first icon ( ) twice.
-
Change the label of the icons by modifying the
labelproperty in theObject Propertiespanel. For example, write&Show a messagein thelabelproperty of the first button and&Closein the second one. Also, set theidproperty toID_SHOWMESSAGEandwxID_OKin the first and second button, respectively.
Properties of the first button.
-
Now, it is time to add event handlers to the buttons. Switch to the
Eventstab in theObject Propertiespanel. Set the value ofOnButtonClickfor the first button toOnShowMessageand set the value toOnClosefor the second button.
Events of the first button.
-
Now, you are ready to generate the code! Press F8 or
 .
If everything is correct, you will see a message in the status bar
which says the code has been generated.
You can view the output code at any time in the C++ tab.
-
Now it is time to integrate the generated code with your IDE (CodeLite, Code::Blocks, Dev-C++, Visual C++...). You will have to add the generated files (tutorial_gui.h/cpp) to the project.
-
Each time you generate code from wxFormBuilder, the file you generated the last time will be overwritten, so you cannot add your event handlers directly to that file. The approach chosen in wxFormBuilder is to subclass the generated classes. So, launch the
Generate Inherited Classwizard fromTools | Generate Inherited Class.
Generate Inherited Class Dialog
-
Select the name of your form,
TutorialDialogGui, so you can modify the name of the generated class.
Form Name Selected
-
Change the class name to
TutorialDialogand the file name totutorial. Make sure to check the box for your form before clicking "OK".
Names Changed, Form Checked
-
Click "OK" in the dialog, if all goes well you will see a "Class Generated" message in the status bar. You should find
tutorial.cppandtutorial.hnext to your other generated code, in the directory where you saved your project file.The header file will look like this:
#ifndef __tutorial__
#define __tutorial__

/**
@file
Subclass of TutorialDialogGui, which is generated by wxFormBuilder.
@todo Add your event handlers directly to this file.
*/

#include "tutorial_gui.h"

/** Implementing TutorialDialogGui */
class TutorialDialog : public TutorialDialogGui
{
public:
    /** Constructor */
    TutorialDialog( wxWindow* parent );
};

#endif // __tutorial__
This is the example source file:
#include "tutorial.h"

TutorialDialog::TutorialDialog( wxWindow* parent )
:
TutorialDialogGui( parent )
{
}
-
Now, you need to add the implementation of your event handlers to the generated
TutorialDialogclass. The event table is generated in thetutorial_guifiles, so you just need to add the functions to theTutorialDialogclass. Here are the same two files with event handlers added.The header file will look like this:
#ifndef __tutorial__
#define __tutorial__

/**
@file
Subclass of TutorialDialogGui, which is generated by wxFormBuilder.
@todo Add your event handlers directly to this file.
*/

#include "tutorial_gui.h"

/** Implementing TutorialDialogGui */
class TutorialDialog : public TutorialDialogGui
{
public:
    /** Constructor */
    TutorialDialog( wxWindow* parent );

protected:
    // Event handlers
    void OnShowMessage( wxCommandEvent& event );
    void OnClose( wxCommandEvent& event );
};

#endif // __tutorial__
This is the example source file:
#include "tutorial.h"
#include <wx/msgdlg.h>
#include <wx/app.h>

TutorialDialog::TutorialDialog( wxWindow* parent )
:
TutorialDialogGui( parent )
{
}

void TutorialDialog::OnShowMessage( wxCommandEvent& event )
{
    wxMessageBox( wxT("wxFormBuilder Tutorial") );
}

void TutorialDialog::OnClose( wxCommandEvent& event )
{
    wxTheApp->Exit();
}
-
All you are missing now are the source files for the main application. Add two new files to your project and in the
OnInit()function of your wxApp derived class create an object of typeTutorialDialog.The header file might look like this:
#ifndef __WXWIDGETSAPP_H
#define __WXWIDGETSAPP_H

#include <wx/wx.h>

class wxWidgetsApp : public wxApp
{
public:
    wxWidgetsApp();
    virtual ~wxWidgetsApp();
    virtual bool OnInit();
};

DECLARE_APP(wxWidgetsApp)

#endif
The source file might look like this:
#include "wxWidgetsApp.h"
#include "tutorial.h"

IMPLEMENT_APP(wxWidgetsApp)

wxWidgetsApp::wxWidgetsApp()
{
}

wxWidgetsApp::~wxWidgetsApp()
{
}

bool wxWidgetsApp::OnInit()
{
    TutorialDialog* dialog = new TutorialDialog( (wxWindow*)NULL );
    dialog ->Show();
    SetTopWindow( dialog );
    return true;
}
You can download all of the files from this tutorial here: tutorial.zip
Compile and run your project!